Sunday, June 5, 2011

My Garden

I am tired of hearing about green thumbs or lack thereof. We were hunters and gatherers and then farmers. Plants die, it happens and then you grow them again. I am sure a knack for gardening would be relevant if I were the growing blue roses for a moghul king but as it stands anyone can grow a bunch of herbs and some flowers.

That said gardening does not come easy to me. It requires that you plan ahead, be patient, accept failure but try again, respect what a plant needs but show them who is boss. All of these are reasons I wanted to garden. I am slave to immediate gratification. My eye is always on the goal.

Gardening is hard for me yet I find it so rewarding because it does not let me hurry things along. I am forced to enjoy the process and not the results ( when you see the produce I picked after a month and a half of seed germination, transplanting, watering, fertilizing you will understand what I am talking about).

I tell you all this only because I am not capable of getting right to the point and like to meander through a labyrinth of words at the drop of a hat.

The purpose of this post was only to put up pictures of some of my plants as they stand today so I have an opportunity to compare a few months down the line.


I have a couple of window boxes of lettuce growing with some arugula sharing space with them. These were too much work for too little returns. And also seemed to attract more pests than all of my other plants. I will hesitate to grow these again.


A pot of flat leaf parsley.


This is one of the few plants that survived from last year. Though it is also one of the few perennials that I grew.


Rosemary - I picked some fresh rosemary off this plant for my bread.

Sweet basil - I have two pots of sweet basil and am considering planting more. You can never have enough basil as far as I am concerned. By far my favorite herb. I am also starting a couple of other types of basil.

Thai basil - Last year I had bought a Thai basil plant that was quite tasty but in the end flowered and went to seed. This year I am growing mine from seed. So far the plant looks healthy. I have not tasted any so do not know if these will be as nice as the plant I had last year.


Mint - Since mint does not grow true to seed and I had no idea where to get cuttings from , I went out and bought a small plant about a month ago. This mint is growing rapidly and has already reached its capacity in that 8 inch pot. If it show any signs of distress I might have to re pot these into a bigger container. Not something I want to do since I have a really tiny patio and a lot of plants.

Growing some assorted chillies from seed.

Two Tomato plants


Eggplant

Crookneck squash.

Fennel - not sure why I grew these. I can not find too many uses for the leaves and I do not want to dig up bulbs at the moment. Again not sure if this is a plant I will repeat.

And finally with an imaginary drum roll - today's harvest.

Lets see how many of these survive in the coming months with multiple vacations planned.

Saturday, June 4, 2011

Unmoved from wordpress

I moved to wordpress only to realize that I cannot do any of the things I already do in blogspot as long as I use wordpress.com.
So I unmoved from wordpress. I am pretty sure I am missing something since I have never heard anything but good things about wordpress. But I cannot even seem to make google analytics work with wordpress.com

Whole Wheat Rosemary Bread

I am a big fan of the rosemary bread served in Macaroni Grill. As lovely as that bread is I was convinced that rosemary would be perfect in a whole wheat bread. The natural sweetness of a whole wheat bread seemed like a great match for rosemary. I am pleased to report that I was right and a little less pleased that other people have had this idea already. Nevertheless the other recipes did help a lot in the actual baking so I suppose it all worked out for good. The recipe I followed is here.

1 to 1 and 1/cup warm water
1 packet yeast
2 tsp sugar
1 and 1/2 cups bread flour ( King Arthur Bread Flour)
1 and 1/2 cups whole wheat flour ( King Arthur White Whole Wheat Flour)
1 tsp salt
2 tbsp oil
2 tbsp chopped fresh rosemary or dried rosemary ( I used a combination of the two since I did not want to over tax my relatively new rosemary plant)

Proof the yeast with the water and 1 tsp sugar. Add the flour and the salt to a bowl and stir. Add the oil and the rosemary to this mixture. To this also add the yeast and water mixture. Knead the dough for 10 minutes until you get a smooth dough. Add a little flour if the mixture is too wet for you.

Cover the dough and let it rise in a well oiled bowl for an hour. After an hour punch the dough down shape it into a loaf and put it into an oiled loaf tin for the second rise. Cover and let the loaf rise again for 45 minutes to an hour till the dough is 1 to 2 " above the loaf tin.

Preheat the oven at 350 F for about half an hour. Remove cover from loaf and bake for 35 to 40 minutes.

Be gentle with the loaf. I actually managed to knock mine some and the bread fell a little. Despite that I ended up with a very wholesome tasting whole wheat rosemary loaf for sandwiches all of next week.


Have a great weekend.

Olive Bread

I love olive bread. When I lived in Oregon I used to pick up a loaf of black olive ciabatta that was fantastic.
This is the first attempt at this olive bread. This is not a ciabatta but a more basic loaf. I found a recipe online that I liked and then modified it to suit my taste. The recipe was for olive and rosemary bread. Since I also wanted to make whole wheat rosemary bread I held off putting rosemary in this. Also I do not like any egginess in my bread. Even New York City challahs manage to repel me as a result. So I left out the one egg that the recipe called for and added extra water to compensate.

3 cups bread flour
1 cup water ( Start with 3/4 a cup along with yeast and add more as you go along)
1 tbsp sugar
1 and 1/2 tsp salt
one cup sliced black olives
2 tbsp olive oil
1 tbsp active dry yeast or a packet of dry yeast.

Warm the water to 110 F and add sugar and yeast to it. Set aside and let it proof for 8 minutes. The mixture should be bubbly at the end of eight minutes.
Now add the olives, oil and bread flour to the mixture. Notice I am leaving out the salt. The original recipe used this method and I wanted to try it out. I have to say I like the results. Knead the resulting mixture for around 5 minutes. This will result in a very sticky dough. Set the dough aside for 15 minutes. Make sure to cover the dough so it does not dry out.
Come back after 15 minutes and add the salt on top of the dough. Knead the dough well for another 5 or so minutes. Adding the salt later gives the yeast a better chance to do its magic. Salt kills yeast and this delay in adding salt gets things started in dough a little quicker.
Form the dough into a rough ball and place it in a well oiled bowl. Let the dough rise for an hour at 90 F. I followed some online advice and placed the dough in my oven with the oven light on. Do not switch the oven on at this point. That will NOT be a pretty thing.
After an hour punch the dough down. Knead the dough for 30 secs. Form into a ball and place on a baking sheet that has been oiled and dusted with flour. Cover the dough with a towel and let it rise for another 30 min.
Preheat the oven for about 20 minutes at 400 F. The original recipe called for preheating the oven for an hour. The original recipe also baked this bread in a very nice looking cloche.
After 30 minutes remove the towel, slash the top of the bread with a sharp knife and bake for 35 to 40 minutes.
To help with crust formation I heated some water in a stainless steel pan and placed it under the bread in the oven while cooking. You can find more information online about this method. Since I do not own a Pizza stone or a cloche the crust on my breads need all the help they can get.

Take out and cool on the rack.
The crumb was quite nice in the finished product.

Thursday, June 2, 2011

Pav

I did some more baking. This time I decided to make some simple pav. I have tried pav before had over baked it. Though it looked rather pretty last time the pav itself was a little on the tough side. This time I cooked it right and also followed a slightly different recipe.
Ingredients
3 cups bread flour
1 to 1 and 1/4 cup water ( this will vary quite a bit based on humidity)
1/2 tsp salt (to taste)
1 tsp sugar
3 tbsp butter ( the next time I am going to try oil but I did not want to risk things this time)
1 and 1/2 tsp yeast or one packet of yeast
Warm the water so it feels warm to touch. Even slightly too hot and you will kill the yeast, the water should be only just warm. Add sugar and the yeast. Stir and set aside for 8 minutes.

Take a large mixing bowl that is convenient for kneading. I prefer to knead in a bowl, a lot of people seem to prefer a floored board. Whatever floats your boat is fine. Add the flour and the salt and mix thoroughly.

Add the proofed water, yeast and sugar mixture ( which should be all bubbly) to the flour and mix. The resulting mixture will be quite sticky. Knead the dough for 5 minutes until it is a little more manageable but will still be sticky. At this point add melt the butter and add it to the mixture. The dough will become a lot easier to knead :). Knead the dough for 5 more minutes. Shape into a ball and put it into a well oiled container. Cover and let the dough rise for an hour.
After an hour the dough should have doubled in the size.

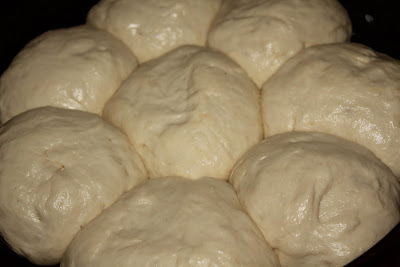
Take the dough out and punch it down and knead a couple of times. Now form a long tube like shape with the dough. You can make up to eight well sized pavs with this mix. Cut the tube into equal portions with a knife and shape into pavs. Put them together on a oiled and floured baking sheet or cake pan. I used a cake pan this time but will probably use a baking sheet the next time since I think that would give me a more traditional pav.Cover the pavs and let them rise for 30 or so minutes. Brush the top of the pavs with egg whites. I do not like the smell of eggs and so I brushed the top with some milk.

Pav recipe. After second rise.
Preheat the oven at 350 F. Put the pav in and let it bake for 20 to 22 minutes. Check if they are done. They should have the beginnings of a golden colour on top. Brush with a little butter on top to ensure a soft pav

Pav Recipe. After Baking
Pav recipe. Closeup of texture. SoftLink

I was very pleased with the end result.

Edited to add.
I found this video from Vah Chef very helpful. It helps to get an idea about the texture you should be shooting for. I Looooove Vah Chef. The guy has an unabashed enthusiasm about food that is obvious in every recipe that he puts up.

Wednesday, June 1, 2011

Spaghetti with Brussels Sprouts, Bell Pepper and Basil

Sometimes you need to marinate for a day, roast slowly for an hour, simmer for 90 minutes and sometimes you can get a lovely colourful meal by throwing some of your favourite vegetables together with some whole wheat pasta.

For dinner there had whole wheat spaghetti with brussels sprouts, yellow bell pepper, sun dried tomatoes.


For a simple summer meal

1/2 a packet of spaghetti
1 head of garlic chopped
3 tablespoons of olive oil
1 tablespoon chili flakes
2 yellow bell pepper (or you can use red bell pepper) chopped thin slices
a dozen or so brussels sprouts sliced thin
one onion chopped thin slices
one cup of basil leaves washed and chopped


Set up a pot of water to boil. Salt the water. When the water comes to a boil add the spaghetti and boil according to instructions on the packet. Drain when done.

Heat the olive oil in another pan. Add the chili flakes and the garlic. Make sure the oil is not too hot, you do not want the garlic to brown just to cook gently and flavour the oil. Add the thin slices of onions and the thin slices of bell pepper. Stir to coat. As the onion is beginning to become translucent add the brussels sprouts. Add salt to taste. Cook on a medium flame till the vegetables are tender.

Add the spaghetti to the vegetables and add the basil leaves. Stir to coat the pasta and cover for a minute or so to kind of let the basil sweat with the rest of the pasta and flavour it.

Serve with a generous sprinkle of Parmesan.

Start with Bread

I opened this space a loooooong time ago. Food and I have a long complicated history. And my relationship changed forever when I started to cook. At one point it was enough that I got to eat something cool but now the experience is not complete till I can reproduce the dish/ alter it to my tastes.

I like to cook. I wish I could say things like it relaxes me. It does not- I cook like I do most do things - with adrenaline, stress poured in, hating myself for not being better even the first time. But I enjoy it. It is what I like to do that I do not have to do.

So to backtrack I opened this space a loooong time ago. I wanted to file away the things I enjoyed making, enjoyed eating and sharing. But I never did anything about till now.

And I will start with bread. Simple, wholesome bread. My husbands face as he eats bread is another reason I love the man. It is such a simple yet bordering carnal experience to eat good bread. And he appreciates it as deserves to be appreciated.

This is a recipe for a bread with some oats thrown in. I am working through some recipes from the King Arthur site. I also recently switched to King Arthur for all my baking and have been kicking myself for being a cheapskate and not doing it earlier. That one dollar that I am shelling out extra per 10 lb bag - very very worth it.

I am relative new comer to baking. The strictness of baking in that there is no stirring, tasting and adjusting makes it less enjoyable to me. But after some success the taste of fresh homemade bread makes the rest of the process more bearable.


I changed the recipe a bit and in place of 3 cups of Bread Flour used 2 cups of Bread Flour and 1 cup of whole wheat flour. I have made the recipe as is and it is delicious, the altered version is a bit denser but still very tasty.

Edited to add
I wanted to add what I did since I was told that some of my friends could not bring themselves to click on a link to get at the ingredients. So -
I added
2 cups bread flour (King Arthur)
1 cup white whole wheat flour (King Arthur)
1 cup of oatmeal
1 and 1/4 cup low fat milk
1 and half tablespoons butter melted a little in the microwave
2 tsp yeast.
3 tablespoons brown sugar

Warm the milk in the microwave until it feels lukewarm to touch. It should NOT be hot at all. Add a tsp of the sugar and add the yeast. Set the stuff aside for around 8 minutes to proof.

Add all the dry ingredients and the butter and the yeast. Knead the dough for about 10 minutes until a smooth dough is formed. Form a ball with the dough and place it in an oiled container and cover with plastic wrap. Let the dough rise for an hour. The dough should be a little sticky. I have a feeling that my dough was a little on the drier side and might have risen more if it were a tad wetter.

Punch the dough down after the hour and shape into a log. Put the dough into an oiled loaf pan. Let the dough rise for 1 to 1 1/2 hr. I let mine rise for a full one and half hours. It should rise above the top of the loaf pan and should be 1 to 2 " above the top of the loaf pan.

Now heat the oven at 350 F and bake for 35 minutes. Take out and cool before slicing into it.
This is a slightly sweet loaf and lovely for sandwiches.

Edited to add- do taste the dough before the first rise. This dough should be on the sweeter side.

You Might Also Like

Related Posts Plugin for WordPress, Blogger...